Editing Aurora photos. Part 2

In our previous article, we explored the essential steps of Aurora shot editing. We discussed selecting the appropriate foreground and Aurora shots to ensure they harmonize seamlessly. We then enhanced the photos in Adobe Lightroom as a crucial preparation for the next step: merging the landscape and Aurora in Photoshop. If you missed Part 1, I recommend reading it before diving into the Photoshop compositing.
While Lightroom was straightforward, Photoshop is more complex, involving various tools to achieve our goal. I'll guide you through my thought process, explaining the tools and their usage. Let's open Photoshop and start on our final piece!
Merging our Aurora and landscape
To merge the Aurora and our landscape, we obviously need to remove the sky that is currently in our landscape shot. Photoshop's quick selection tool is perfect for this. After making a rough selection of the sky, we refine it using the "Select and Mask" option. Use the Refine Edge Brush Tool to paint along the edge of your selection to improve it, incorporating small details the rough selection might have missed. With your selection still active, create an inverted mask for your layer so only the sky will be masked out. To check for any parts Photoshop missed, place a black layer underneath the landscape. Using the regular brush tool you can paint any inconsistencies back into the mask. You’ll end up with something like this.

To combine both our shots, place your Aurora shot behind the landscape layer. Notice that we’re still not cropping the original shot. The goal is to keep as much real estate as possible, so we can make a choice on cropping later on, as well as room to use warping if necessary. Now that we have a good idea of our composition, we can slightly warp the Aurora to better match the lines of the landscape and to fill in any empty spots. Keep the Aurora and landscape on separate layers for individual adjustments, which is particularly important when we’re still in the process of matching tones.

There’s still a very evident line dividing the Aurora from the landscape in this example, so we need to focus on smoothing the transition between them. To start off, let’s make adjustments exclusively to the landscape. If you want to create an adjustment that only applies to a single layer, you can use clipping masks that clip to the landscape layer. To refine the affected area even further, you can apply a mask to the layers that are already clipped. Using these two techniques, you have precise control over what areas are affected by my adjustments.
First, reduce the saturation of blues using a Hue/Saturation adjustment since the landscape has a lot more saturation than the sky. By using a mask you make sure it’s applied only to the horizon. Our horizon is also more exposed because our sky wasn’t as dark, so we lower the exposure with a Curves adjustment, dragging down the middle point. Since the landscape is still too bright, we use another Curves adjustment to reduce the exposure but this time apply it to the full landscape and not just the horizon.

Working on our final piece
While we previously used separate layers to unify the landscape and Aurora, we'll now merge them using the "Apply Image" technique. We do this to make most adjustments globally from now on. This is the most important technique to blend together images seamlessly, and you should only start working on this last step as soon as you feel like your shot is already well into the ballpark.
To be on the safe side, work on new layers that can be created by duplicating the original ones. This way, you can always revert back to steps in your editing process and take a different approach, without having to start all over again.
Given the adjustments made to match the landscape's exposure with the Aurora, our image is looking a bit dull right now. We’ll work on our contrast to make the overall image more vivid and give it more of a pop.
- First, increase the whites by +50 using the Camera Raw filter. This brings the white point of the overall image up, increasing not only the exposure but also contrast and color. As you can guess, using such an extreme adjustment blows out the Aurora.
- Use an inverted mask (meaning it’s applied nowhere as of now), to selectively paint in the effect with the brush tool. Be careful not to apply it on our Aurora as much to prevent it from overexposing.
To make the center more interesting, I also want to create a glow coming from the horizon. This will further brighten and increase the contrast of the landscape, especially in the center, drawing in the eye of the viewer.
- In a new layer, open up Camera Raw and introduce a large, radial filter in the center. Using the adjustments, increase the whites by about +50 and exposure by about +0.5. While your mask is selected, create a subtractive mask using a color picker, and select the green color of our Aurora to make sure it’s not affected by the mask.
- Repeat this step for the smaller radial filters, spanning about half the size each time you move to a smaller radial.
By stacking these radials in different sizes on top of each other, we can create a convincing glow that feathers smoothly into the landscape.

The Aurora still looks faint, so let’s try to make it pop a little more. To apply the adjustments mainly to the Aurora, use a gradient filter in Camera Raw that covers the Aurora and slightly bleeds into the landscape. Experiment with settings to boost contrast. I usually bump up the whites, increase clarity and dehaze a little, and work on the curves to create an s-curve. Be cautious of potential highlight overexposure, especially when handling the whites and the top corner of the curves. Use a subtractive brush with a low flow for precise control and paint over the highlights to recover them and reduce the adjustment intensity if needed.

This Aurora is looking great, so let's focus on the landscape now. The foreground, particularly the near foreground, appears quite bright. To darken the landscape and increase the overall contrast, we use a Camera Raw filter and reduce the shadow area in the curves panel. However, this also leads to higher saturation and a loss of detail in the shadows. So we need to address these issues with a couple of basic adjustments that counter this effect, making it more balanced.
- Open up the shadows slightly to preserve more details in the darker parts of the image.
- Using the HSL, reduce the blue color’s saturation just a tad until it feels more natural.
- If you notice a hint of purple in the landscape, use the temperature to adjust the tint toward green.
Typically, you want to mask out parts that you want unaffected by this adjustment, but in this particular case, it nicely enhances the Aurora as well, so I choose to keep this layer applied to the entire image.

Our shot is almost finished and ready for final adjustments.
During your editing process, you may notice some details you initially missed. Our composition appears slightly slanted to the right, which we'll correct using the warp tool to achieve a better balance between the right and left sides. This action also allows us to remove distracting small rocks in the center.
To emphasize the Aurora and reduce the distraction of stars, we’ll be using a technique that is common in astrophotography.
- Duplicate your layer and select all the stars using Select > Color Range. By sampling a star and adjusting the fuzziness, we can accurately select all the stars.
- Expand our selection by 1px and then feather it by 1px.
- When you have a good selection of stars, go to Filter and select Other > Minimum. A small value like 1px should be enough. This filter dims all the stars that were selected.
- For added depth in the sky, selectively mask out some of the larger, more prominent stars, preserving their original appearance.
- Lower the opacity if you feel like the effect is too strong. The goal is to strike a balance that feels natural and not as noticeable.
We’re going to extensively process it through Camera Raw one more time from start to finish as if we’re developing the raw. Be careful with the adjustments since you don’t have the image data you had in the original file. So it’s best to avoid using color ranges, luminance ranges and using the HSL panel. These tools will very quickly introduce banding.
Drop the dehaze to -10 and clarity to -20. This helps to smoothen out the image further and also gives it a dreamy feeling, decreasing the contrast around sharp edges. Since this is done as one of the last steps, you won’t lose as much detail since a positive dehaze and clarity were applied in the early stages.
Then raise the black point slightly in the curves layer to get a faded black, while dragging down a point in the shadow area to maintain contrast. At the same time open up your shadows and blacks to get a smooth roll-off from midtones to the faded black.
Using the Color Grading panel, you can work on your colors by inserting a slightly saturated blue in the highlights and a very minimally saturated blue in the shadows. This gives the Aurora a good color boost.
At this point, our landscape has turned very cold so we increase the temperature of the landscape using a gradient.
And as a final step, apply a vignette to our frame to further draw in the viewer.

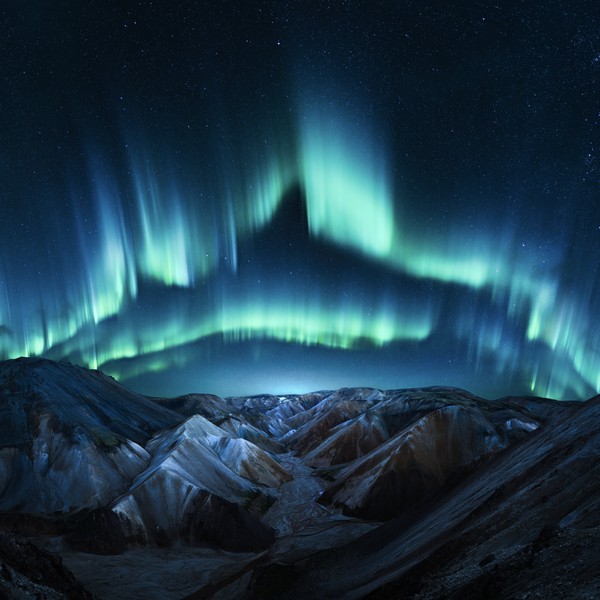
Our piece is now ready to be shared! Since the composition was kept as wide as possible, there are a lot of possibilities we could do in terms of cropping. This is particularly important if you plan on using your result for various media such as socials, websites and print.
Closing words
From the initial stages of capturing our Aurora and landscape shots to the meticulous merging in Lightroom and Photoshop, it's been quite an extensive process. However, in the process lies the beauty. It’s not every day that we get to capture and edit one of these pieces, and working on it for so long makes it nothing short of a magical piece for us. One that you’ll cherish for a long time.
While the tools and techniques shared here offer a roadmap, remember that each image carries its unique challenges and narrative. Don’t shy away from adding your own tweaks or making different choices based on what feels right for your photo.
Thank you for sticking with this guide till the end. Now, take the skills, play around, and most importantly, have fun with the process!