Quick Start Guide — Resolve
This guide is for Neat Video v4 plug-in for OFX hosts being used with DaVinci Resolve 12.5.
If you use another version of Neat Video plug-in or another editing application, please select the corresponding quick start guide.
1. Installing the plug-in
To install the Neat Video OFX plug-in:
-
Make sure you have started Resolve at least once before installing the plug-in. If you
have not done that yet, start Resolve and exit it.
- Download the installer of Neat Video for OFX hosts:
- If you already purchased the product and have a current license for the Pro plug-in, please download the Pro plug-in from My Products page
- If you want to try Neat Video before purchase, please download the Demo plug-in from Download page
- Start the installer:
For Windows:
Double-click the downloaded EXE file to start the installer
For Mac OS X:
a. Double-click the downloaded DMG file to mount the volume
b. In the mounted volume, double-click NeatVideoOFX.Intel.pkg to
start the installer
(you may be prompted to enter the Name / Password of the OSX
administrator account)
For Linux:
Double-click the downloaded package Neat VideoOFX.Intel64.tgz to
open the archive and extract the installer from it (
NeatVideoOFX.Intel64.run ). Then start the installer.
(you may be prompted to enter the Name / Password of the administrator account)
-
Proceed through the steps of the installation process. Use the default settings offered
by the installer. This should automatically make the plug-in available to Resolve.
- Start Resolve, go to the Color tab, then to the OpenFX panel and then to Library > Neat Video > Reduce Noise v4.
In case the plug-in has not become available in Resolve, please contact Neat Video support for assistance.
2. Running Neat Video on a sample video clip
Please download the test-kit prepared to help you start using Neat Video. Having downloaded, please unzip it to a new folder on the hard disk.
The test-kit includes a sample video clip: SampleClip.mp4. This is a typical video clip captured by a digital video camera in high-gain mode. Some technical information about the sample clip is available in the SampleClipInfo.txt file.
Please start Resolve and go through the steps below to clean the clip using Neat Video.
2.1. Add the sample clip to the project
1. Configure a new project in Resolve
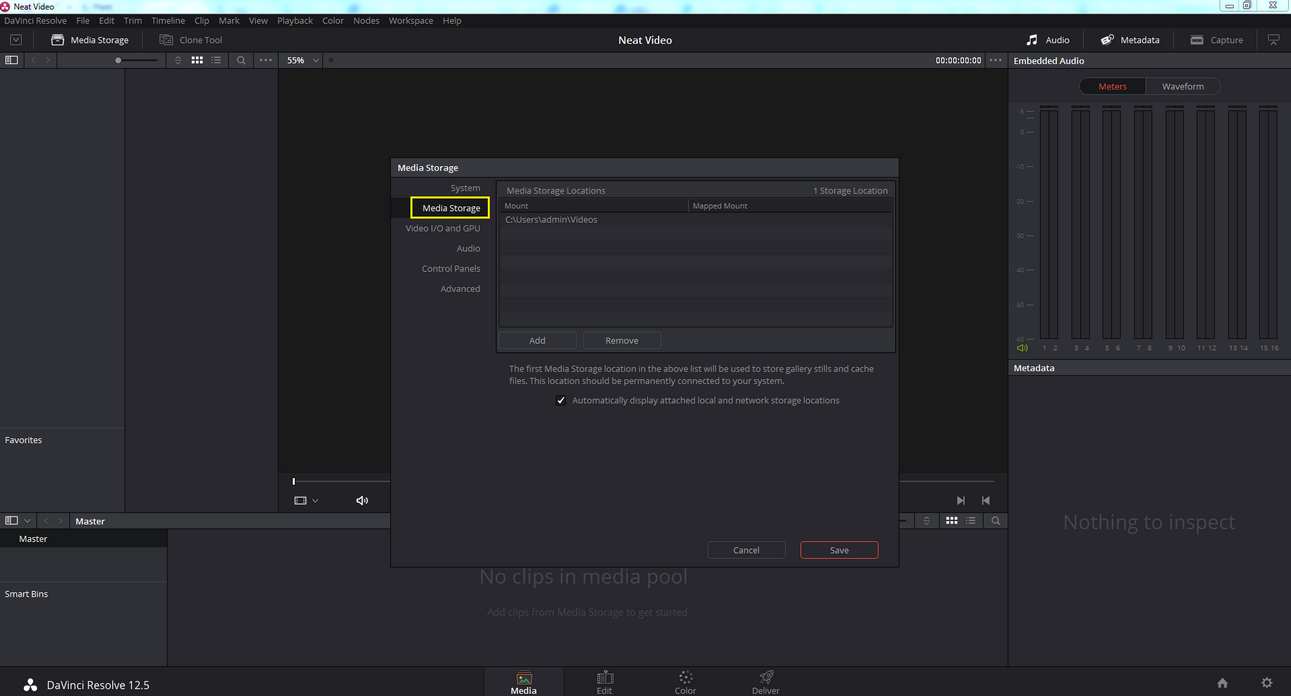
Go to Preferences to set up the Media folder where all media files are stored:

Resolve will then display a Media Storage dialog to specify the folder where all media files would be kept. Select folder and click Save .
2. Add the sample clip file to the project
- Navigate in the Media Storage panel to the folder with input clip, double-click the selected clip ( SampleClip.mp4):

- Drag-n-drop the input clip into Master panel.
- If Resolve says “The clip(s) have a different frame rate than the current project settings” and asks “Would you like to change your timeline frame rate and video format to match?” select Change.

3. Add the sample clip to the timeline
- Click the Edit button in the bottom.

- Drag-n-drop the clip from the Media Pool tab to the timeline.
- A new timeline ( V1, A1) will appear:

2.2. Prepare to add Neat Video to the clip
- Click the Color page.
- Use the timeline controls to select a frame with large flat featureless area; the selected frame will be used for analysis in the next stages.
- Click the magnifying glass button at the upper right-hand corner of the OpenFX panel (to display the OpenFX panel).
- In the OpenFX panel navigate to Library > Neat Video > Reduce Noise v4 in the list:

2.3. Configure Neat Video
1. Open Neat Video plug-in window
- Drag-n-drop Reduce Noise v4 to the node of the clip in the Nodes panel. This will enable the Settings tab in the OpenFX panel.
-
Click Prepare Noise Profile in the
Settings panel to open the Neat Video plug-in window.
(If you run the Demo plug-in, click OK in the popup splash screen of the plug-in to proceed further).

The Neat Video plug-in window will open and display the current frame from the clip:

- At this point Neat Video will ask to specify the scan type of the clip. Please select Progressive.
Note that the current builds of Resolve 12 (except Resolve Studio 12) do not provide adjacent frames required by Neat Video v4 to display them in the main window of the plug-in. Those missing frames are marked with "N/A" in the thumbnails shown in the main window of Neat Video. This does not affect rendering in Resolve, this only affects the preview inside Neat Video window. The current (central) frame is still provided correctly, so it is possible to build a noise profile and check preview of some of the filters inside Neat Video. To evaluate the complete preview including results of all filters, it is necessary to Apply (to close Neat Video window) and then check results in Resolve preview.
2. Build a noise profile for the clip
To reduce noise in this frame and in the whole clip, Neat Video generally needs a noise profile describing the noise properties of the clip. You can prepare such a profile using the Auto Profile function:
-
In the Device Noise Profile tab
 click
click

Neat Video will then automatically analyze the noise to build a new noise profile:

- Visually inspect the selected area — it should contain no visible details, only noise; otherwise the noise profile and subsequent noise reduction may be inaccurate.
If the selected area does contain any details, move the selection to a featureless area or simply draw a new selection in such an area (the selection must be at least 32x32 pixels large). Then click the Auto Profile button again.
- After that Neat Video is ready to filter the clip.
3. Check Preview
-
Switch to the Noise Filter Settings tab

You will notice that Neat Video has already applied noise reduction based on the default filter settings and the preview shows a clearly visible difference: there is less noise than in the original frame.
You can try to adjust the filter settings and see how that affects the results. For example, try to adjust the Temporal Filter > Radius setting (in the Temporal tab in the Filter Settings box in the right part of the window) from 2 to 1 or to a higher value. This will apply weaker or stronger temporal noise reduction to the frame (also see note below).

4. Apply the changes
-
Click
 in the bottom of the plug-in window.
Neat Video will save the current settings and close its main window.
(If you run the Demo plug-in, it will also describe the limitations of the Demo version at
this point).
Once this step is completed and Neat Video window is closed, the filter is ready for work.
The Resolve preview window now shows the clip with noise reduction applied to it:

2.4. Render the video
To apply Neat Video noise reduction
- Use the output of the ReduceNoise v4 node in your project further.
You can now use the output of the ReduceNoise v4 node in your further workflow within the project. The noise reduction is automatically applied to the video data produced by that node.
Please see the User Guide (Win), User Guide (OS X) and User Guide (Linux) for more details about adjusting the filter settings and other aspects of using Neat Video. These Video Tutorials will also help you to get the most out of Neat Video noise reduction.